
A random interval auto clicker changes the delay between clicks instead of repeating one exact interval. Some tools can also vary the click position within a small radius. These controls are useful for testing timing-sensitive desktop interfaces and checking whether a button remains usable across a small target area.
They are not a promise of “undetectable” automation, and they should not be used to evade platform rules. The useful idea is simpler: controlled variance helps you test more than one perfect timing and one perfect pixel.
Table of Contents
Fixed interval versus timing variance
With a fixed interval of 1,000 milliseconds, each click is scheduled one second after the previous click. With timing variance of 200 milliseconds, the actual delay can move within a bounded range around that base interval. The base value still defines the pace; variance adds a small, controlled difference.
Use a fixed interval when exact reproducibility matters. Add bounded timing variance when you want to expose a UI to slightly different delays, such as a refresh button whose enabled state changes after an asynchronous operation.
What position variance changes
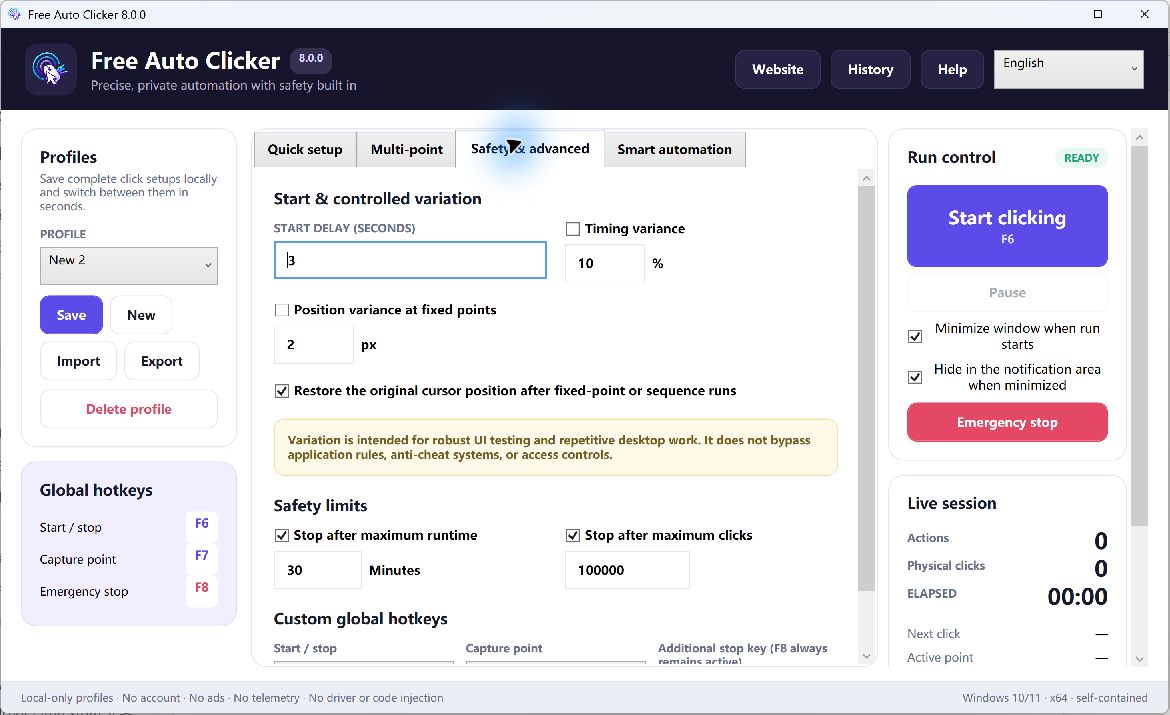
Fixed-position variance moves a click within a small area around the selected point. That can reveal whether a control’s practical hit area matches its visual design. A tiny radius may be appropriate for a large test button. It is dangerous near adjacent controls, menu edges, checkboxes, or destructive actions.
How to configure a bounded random interval
- Start with a fixed base interval. Observe how long the target interface normally takes to become ready.
- Choose a conservative variance. The full possible range should remain safe for the target. If the interface needs at least 800 ms, do not create a range that can fall below that threshold.
- Keep the first run short. Use a small repeat count while checking the real sequence.
- Add an upper safety boundary. Configure a maximum runtime or maximum click count so the test cannot continue indefinitely.
- Save the setup as a profile. Record the base interval, variance, target window, and expected result so a later run is comparable.
How to choose a safe position radius
Estimate the usable interior of the target, not its full visual size. For a wide button, keep the radius well inside the border. If another control is close by, use no position variance at all. A good test asks, “Can every possible point in this radius be clicked safely?” If the answer is uncertain, reduce the radius.
Window-relative coordinates are especially useful here. They keep the center point attached to the target window if that window moves. Without window binding, even a small variance around an obsolete screen coordinate can land in the wrong application.
Worked example: a refresh-state UI test
Suppose a desktop application has a large Refresh button. A successful refresh usually completes in 1.2 to 1.8 seconds, and a status indicator turns green when the next refresh is allowed.
- Bind the workflow to the application window.
- Capture the center of Refresh as a window-relative point.
- Use 1,500 ms as the base interval and a small timing variance that never pushes the test below the app’s safe minimum.
- Optionally add a very small position radius that stays inside the button.
- Use a pixel-color condition to wait for the green ready state.
- Limit the run to ten clicks or two minutes, whichever comes first.
- Run once with variance disabled as the baseline, then compare it with the bounded-variance run.
This is more informative than adding a large random range without an expected result. A useful test has a reason for the variance and a clear pass/fail observation.
Common mistakes
Using a range that includes unsafe delays
If the target needs time to save or refresh, the minimum possible delay matters more than the average. Calculate the lower bound before starting.
Adding position variance near destructive controls
Do not vary a point near Delete, Purchase, Submit, Send, or any irreversible action. Use an exact point, a test environment, and a finite run—or choose a supported test tool instead.
Running without a hard stop
“Until stopped” is convenient for supervised tasks, but it is the wrong default for exploratory variance. Set a click limit, repeat limit, or maximum runtime and keep F8 available.
Calling randomization “human behavior”
A bounded random value is still software-generated input. It does not make automation human, invisible, permitted, or safe on a third-party service.
Responsible-use rule
Use variance for permitted testing and repetitive desktop work. Do not use it to evade rate limits, anti-cheat systems, anti-bot controls, or a service’s terms. If a platform offers an API or test environment, use that supported interface.
Frequently asked questions
Does a random interval make an auto clicker undetectable?
No. Timing variation does not guarantee invisibility and does not change a service’s automation rules.
How much variance should I use?
Use the smallest range that tests a real timing or hit-area question. Make sure every possible delay and position remains safe.
Can I combine timing and position variance?
Yes, but change one variable at a time during initial testing. That makes failures easier to diagnose.
What stops a runaway sequence?
Use a finite repeat count, maximum runtime, maximum click count, and the fixed F8 emergency stop. Test the stop key before a long run.
Continue with the guide to schedules, limits, and emergency hotkeys or learn how to keep points aligned to a target window.
For jitter, spacebar, or timing checks, open the click speed tools.