
Coordinates tell an auto clicker where to click. A pixel-color condition helps decide whether the screen is ready. Instead of clicking after the same fixed delay regardless of state, the workflow can wait for a chosen screen pixel to match the expected color.
This is useful for small, supervised desktop tasks where a stable status light, button fill, or progress indicator represents readiness. It is an additional safeguard—not a complete understanding of the application.
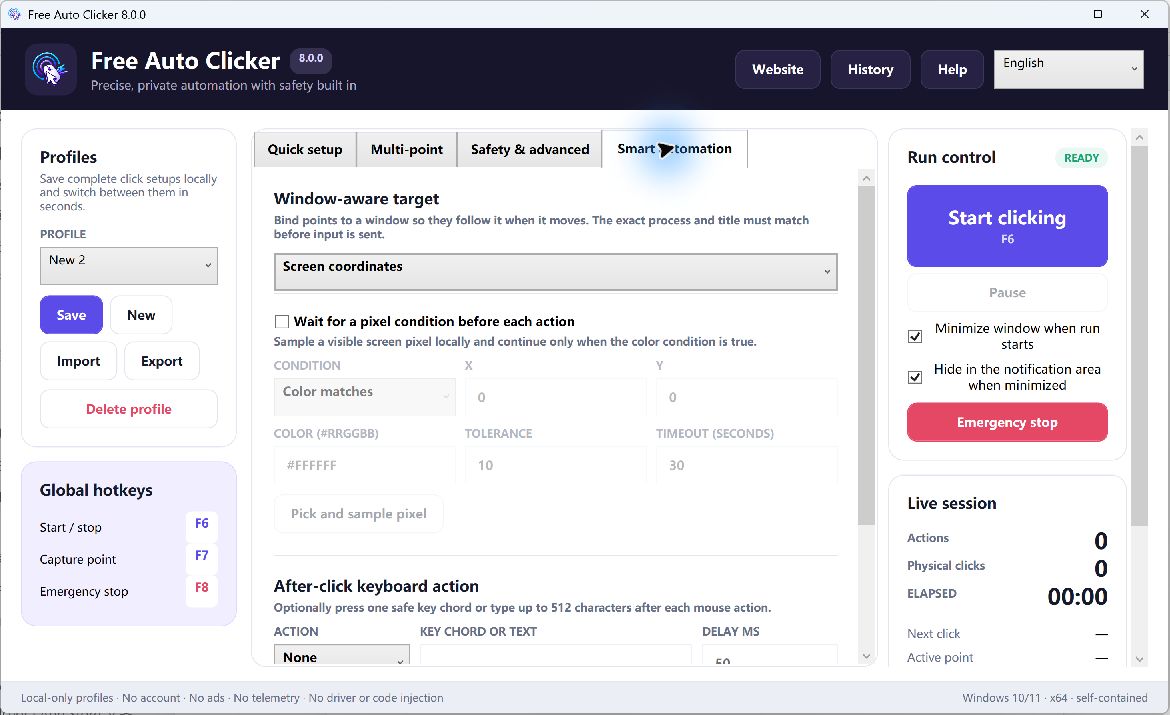
Table of Contents
How pixel matching works
A pixel condition monitors one chosen screen position and compares its current RGB color with the color stored in the workflow. A tolerance allows a small difference. The click proceeds only when the rule is satisfied; a timeout prevents an endless wait.
For example, a test application may render a solid green indicator when a refresh is complete. The sequence can wait for a pixel inside that indicator before clicking Refresh again.
Choose the right pixel
A good sample point is:
- inside a solid, stable area;
- distinct from the surrounding screen;
- unchanged by pointer hover;
- not covered by animation or notifications; and
- present only in the intended state.
Avoid anti-aliased text, thin borders, shadows, transparent overlays, gradients, video, and animated spinners. Those pixels can change even when the semantic state appears identical.
Configure a visual condition step by step
- Open the target application in the state that should permit the click.
- Bind the workflow to the intended window if the app can move.
- Enable the pixel-color condition.
- Capture a stable sample point and its expected color.
- Start with a low tolerance.
- Set a finite timeout.
- Test once while the color matches.
- Test again while it does not match.
The negative test is essential. A condition that always passes provides no protection.
How to set color tolerance
A tolerance that is too strict may fail after a small rendering or color-profile difference. A tolerance that is too loose may accept the wrong state. Begin with the smallest useful value, then test on the actual monitor and Windows settings where the workflow will run.
Do not increase tolerance merely to make an intermittent condition pass. First check whether the sample point is affected by scaling, hover, animation, transparency, remote-desktop compression, or a theme change.
Combine the condition with a target window
An absolute sample point can monitor the wrong application after a window moves. Target-window binding and window-relative coordinates keep the click and monitored location associated with the same intended app. The target should remain visible and in the expected foreground state.
Use cases that fit
- Wait until a button in your own test app changes from disabled to enabled.
- Continue a local demo after a known status indicator appears.
- Prevent a repeated click while a permitted desktop tool is loading.
- Run a short UI smoke test after a stable visual ready state.
Cases that do not fit
One pixel cannot prove that a transaction succeeded, data was saved correctly, the network is secure, or an application is in a complex business state. Use an API, log, test assertion, or supported automation framework when the result matters beyond a simple visible condition.
Why a condition can fail
Display scaling or monitor changes
The sampled location or rendered color may change. Retest after resolution, scaling, monitor, or color-profile changes.
Windows or app theme changes
Dark mode, high-contrast settings, and application updates can alter the expected color.
Remote desktop or compression
Remote display systems can change pixel values. Validate the rule in the exact environment where it will run.
Hover effects
If the pointer changes the control’s appearance, sample a non-hovering state pixel or choose another indicator.
Stop safely when the condition is never met
Always set a timeout and an overall maximum runtime or click count. Keep F8 available as the fixed emergency stop. A condition should fail closed: if the expected state does not appear, stop and investigate instead of clicking anyway.
Pixel-condition checklist
- The sample point represents one specific visible state.
- Both matching and non-matching states were tested.
- Tolerance is no wider than necessary.
- A timeout and overall safety limit are configured.
- The target window and coordinate reference are correct.
Frequently asked questions
Can a pixel condition recognize an entire button?
No. It compares a selected pixel color. Choose a stable point and do not treat it as full visual recognition.
Why does the same color fail on another computer?
Scaling, themes, color profiles, remote-desktop rendering, and app versions can change the pixel value or position.
What happens when the color never appears?
The configured timeout should end the wait. Also use an overall runtime or click-count limit.
Can I use a pixel check with multi-point clicking?
Yes. Use it to guard the appropriate step in a short, reviewed sequence.
Next, learn window-relative clicking and build a repeatable Windows UI test.